


5 Steps for an Easy Summer Air Dry Routine
Some days don't call for blowouts.
The dryer cord stays coiled in the drawer. The flat iron sits cold. The day starts with damp hair and ends with soft, lived-in waves or curls that look like they belong on you — because they do.
A summer air-dry routine isn't a lazy shortcut. It's a deliberate choice to step back from heat tools and let your hair's natural texture do what it already wants. Done right, it leaves hair smoother, healthier, and more aligned with how it actually grows in.
This guide walks through how to air-dry your hair properly in summer, the five-step ritual we recommend, and what the right products do at each stage. No game-changer language. Just a routine that respects the hair you have.
Key Takeaways
-
A summer air-dry routine reduces heat damage, preserves your hair's natural texture, and saves time on humid mornings
-
Oil the scalp first, wash with a gentle shampoo and conditioner, then dry gently with a microfiber towel and brush through with a wet detangling brush — then leave it alone. Friction from fingers and rough towels causes frizz, not the air itself.
-
A weekly hair oil treatment and the right wet detangling brush do more for your air dry than any cream or game-changer spray
Why Air Dry Your Hair in Summer
Heat styling all year is a lot. Blow drying in 90-degree weather is more.
Hot tools strip moisture, damage the outer layer of the hair cuticles, and, over time, degrade the protein structure of the strand. The American Academy of Dermatology has published guidance noting that repeated heat styling weakens hair, contributes to breakage, and can permanently alter the wave pattern or curl pattern of certain hair types. Summer is the easiest season to take a break from heat tools — the warm air does most of the drying for you.
Beyond the heat damage angle, an air-dry routine has practical benefits:
-
Less time on your head. No 20-minute blow-drying session in a hot bathroom.
-
Better for your hair's natural texture. Air-dry hair holds its true wave pattern instead of being stretched out by tension.
-
Lower energy use. Blow dryers pull 1,500–2,000 watts per session — skipping them is one of the easiest swaps for anyone trying to reduce their environmental footprint without overhauling their routine.
-
Reduces frizz when done correctly. The friction from heat tools and rough towel rubbing causes frizz far more than the air itself.
The difference between a great air dry and a mediocre one comes down to a few intentional steps. The five-step routine below is all it takes.
The 5-Step Summer Air Dry Routine
Five steps. Done in the order they're meant to be done.
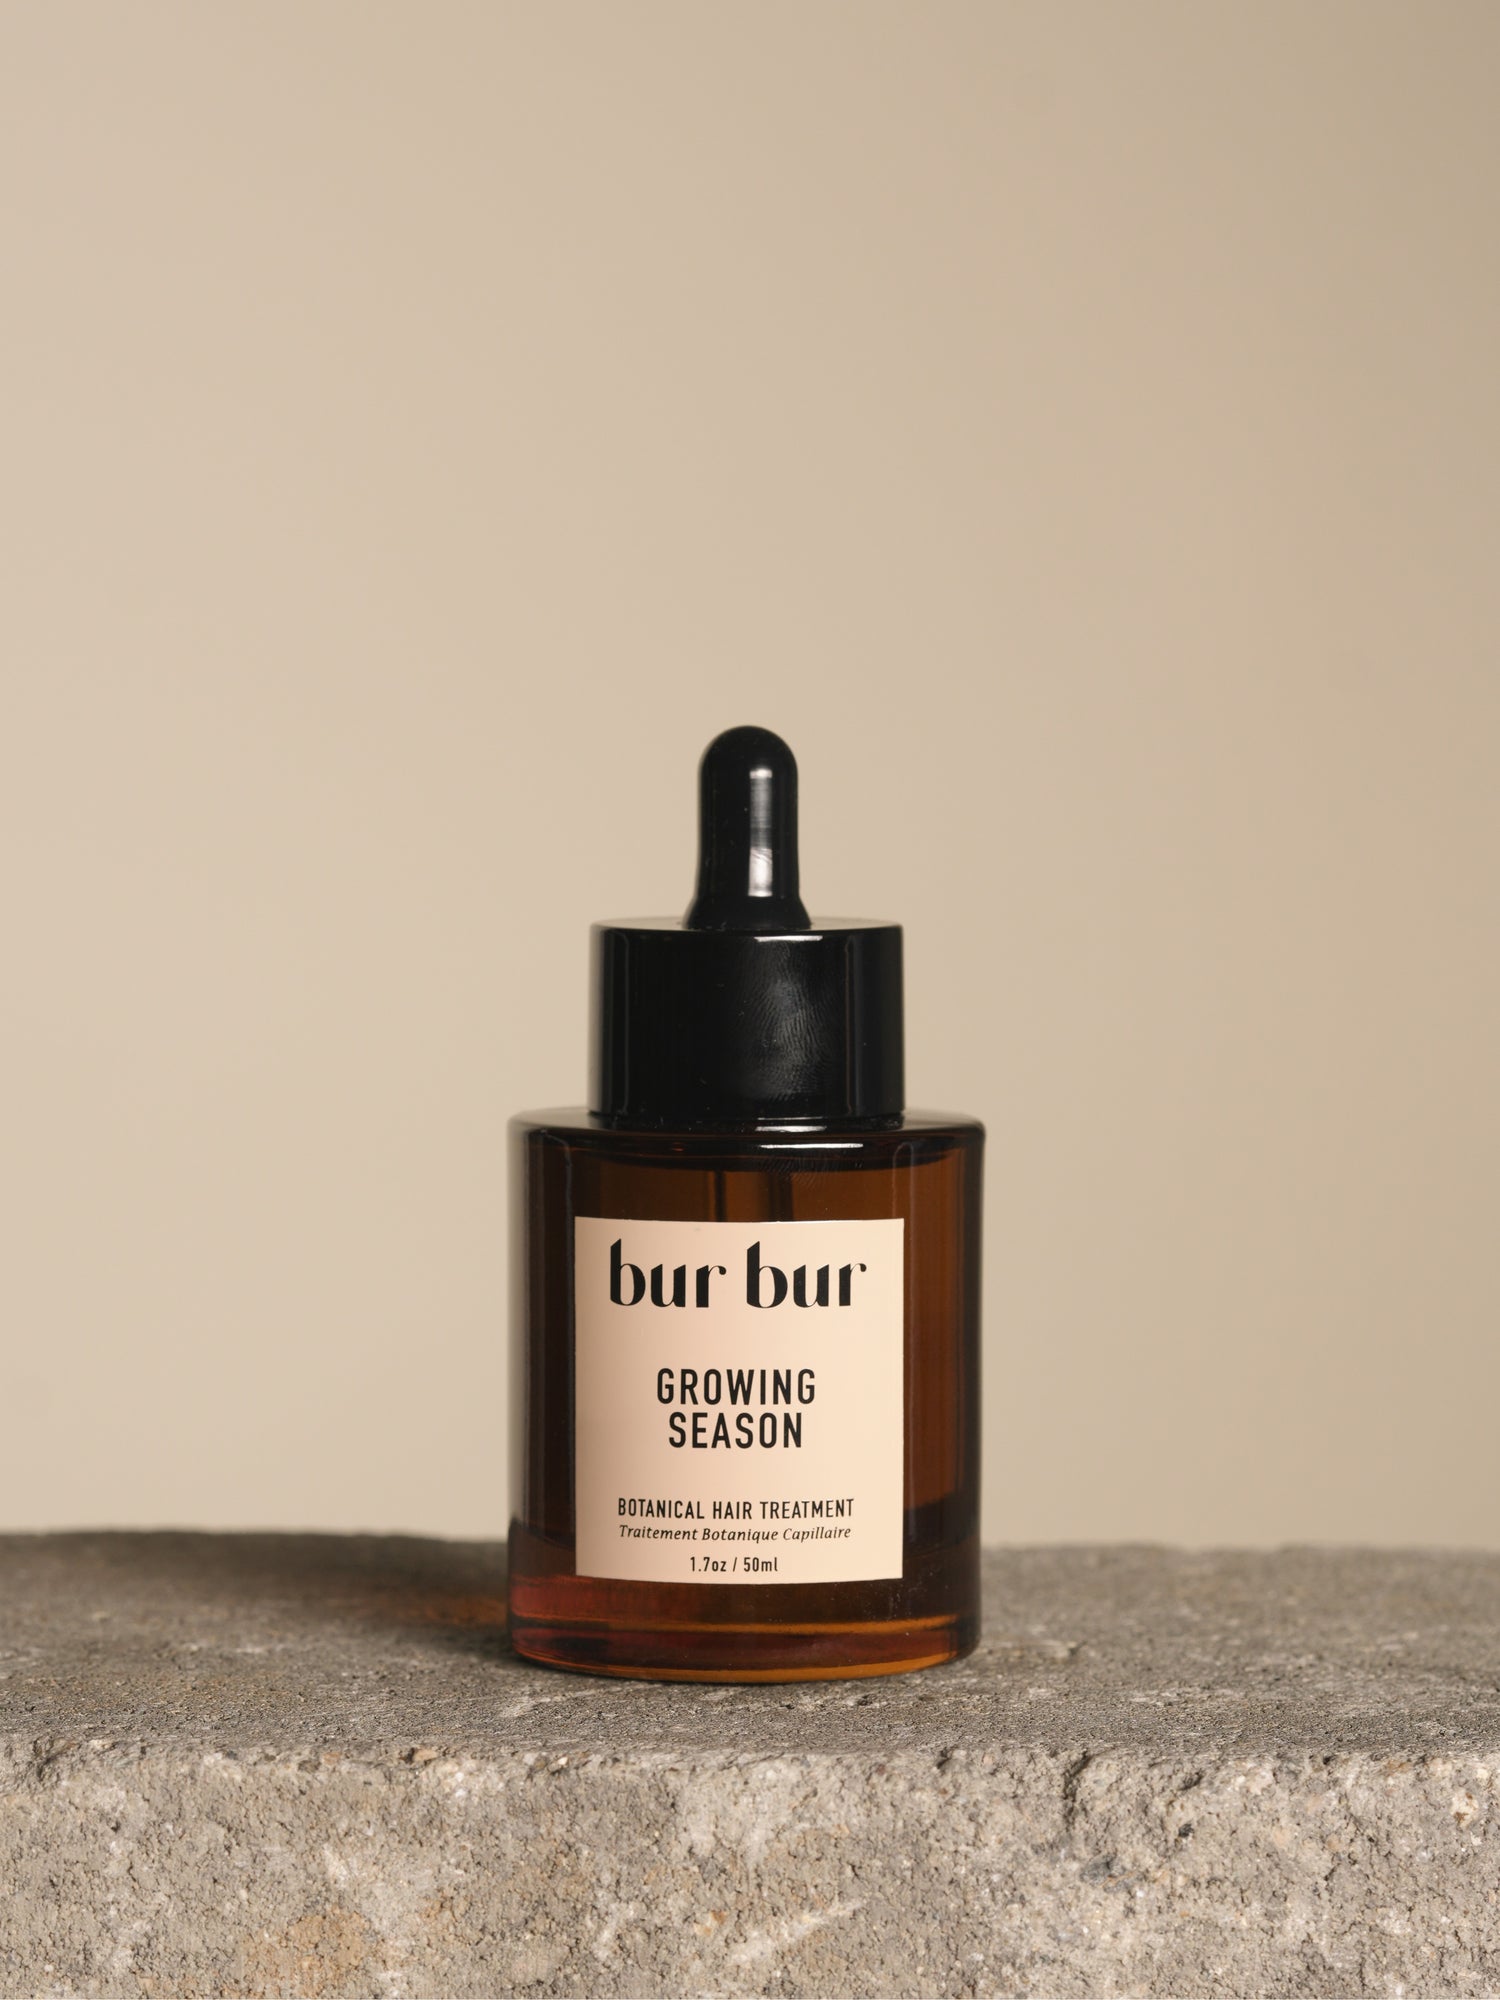
Step 1: Massage Growing Season Into the Scalp and Lengths
A summer air dry starts before the shower.
Massage Growing Season Burdock Hair Growth Oil into the scalp and through the lengths. Let it sit while you're out in the sun, on the beach, or by the pool. An hour is enough. A few hours is better. The oil works on dry hair before you wash, treating the scalp and saturating the strands with burdock and nettle.
This is a pre-shampoo treatment, not a leave-in conditioner. It comes off in the wash. What stays behind is a calmer scalp and stronger strands — and that's what makes the rest of the air-dry work.
Two things happen here:
-
The scalp gets fed. Burdock root delivers anti-inflammatory compounds and nutrients to the follicle. Nettle adds minerals that support the growing strand. A balanced scalp produces healthier hair, which holds its shape better as it dries.
-
The hair gets coated. Pre-shampoo oiling reduces the hair's ability to absorb shampoo and water — meaning less surfactant strips out the natural oils your hair needs, especially in summer when sun exposure already pulls moisture out.
For curly and coily hair, this step matters most. Curly hair and coily hair are naturally drier because sebum has a harder time traveling down a coiled strand. A weekly pre-shampoo oil treatment closes the gap.
-
Pro Tip: Apply the oil to dry hair, not damp hair. Water blocks oil absorption. You want the oil to penetrate the cuticles, not float on top.
Step 2: Wash With Growing Season Nourishing Shampoo and Conditioner
Time to rinse the oil — and the sweat, sunscreen, and chlorine that came with your day out.
Use Growing Season Nourishing Shampoo on the scalp. Work it in with your fingertips, not your nails. Two washes are recommended if you applied the oil heavily or have thin and virgin hair that gets greasy fast. Rinse fully.
Follow with Growing Season Nourishing Conditioner from mid-length to ends. Leave it for 2–3 minutes while you finish your shower. Rinse fully.
A few notes on this step:
-
Rinse fully means rinse fully. Residue left on the strand is one of the things that causes frizz once the hair dries. Run cool water through the lengths for the last 15 seconds. Cool water helps the hair cuticles lie flat — a small thing that adds up to a smoother air-dry hair finish.
-
Don't skip the conditioner. Especially in summer. Sun and salt strip lipids from the strand. Conditioner replaces them. Skipping it is the most common reason air-dry hair looks dry and dull by mid-morning.
-
Squeeze out the excess water before stepping out. Gentle hands. Soaking wet hair travels more friction onto a towel than damp hair does.
For coily hair, you may want to detangle in the shower with conditioner still on the strands and a wet detangling brush. We'll get to brushing in step four — but the principle is the same: work with soaking wet hair coated in slip, not with bare strands.
Step 3: Towel-Dry Gently With a Microfiber Towel
This is where most air-dry routines go wrong. Don't rub.
Standard cotton bath towels are rough. The cotton fibers lift the outer layer of the cuticles, create static, and cause frizz before the hair has even started to dry. Switching to a microfiber towel — or a soft cotton t-shirt in a pinch — is one of the simplest upgrades you can make to your summer air-dry routine.
How to use a microfiber towel correctly:
-
Gather the hair at the ends and gently squeeze out the excess water.
-
Wrap a section of hair in the microfiber towel and press, don't rub. The towel absorbs the excess water through capillary action; it does not need friction to work.
-
Move from ends to mid-lengths. Don't touch the roots aggressively — root friction is what creates the lift you didn't ask for and a halo of frizz around the crown.
-
When the hair is no longer soaking wet but still clearly damp, set the towel aside. You're done with it.
The cotton T-shirt method works on the same principle. A soft cotton t-shirt has flatter, finer fibers than terry cloth, which means less surface friction on the hair cuticles. Curly-haired people have used the t-shirt method for years — the microfiber towel is the same idea, just purpose-built for it.
What this step does, in plain terms: removes excess water without disturbing the hair's natural texture or lifting the cuticles. Done right, the hair is now damp hair — wet enough to take styling products and brush through cleanly, dry enough to start setting into its true wave pattern or curl pattern.
-
Pro Tip: Never wrap wet hair in a tight terry-cloth turban for an hour. The combination of friction and prolonged tension stretches the strand at its most vulnerable. Damp hair held under tension while it dries is a primary cause of breakage.
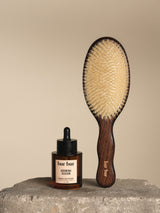
Step 4: Brush Through With the Detangling Brush, Starting at the Ends
Now the Mermaid Brush — Wet Detangling Brush earns its keep.
A wet detangling brush has flexible bristles designed to glide through damp hair without snagging. It's the right tool for this step because wet hair is more elastic than dry hair, and the wrong tool — a stiff boar bristle brush or a fine-toothed comb — will snap strands that would have survived a gentler pass.
Technique matters more than the brush itself:
-
Start at the ends. Always. Work out the bottom two inches first.
-
Move up in sections. Once the ends are tangle-free, work the middle. Once the middle is clear, work from the scalp.
-
Brushing from the root down on tangled, wet hair is how you break a strand. Avoid disrupting the bond between cuticle scales by working upward in stages.
-
One full pass top to bottom at the end. Once each section is detangled, run the brush from scalp to ends to distribute the natural oils evenly. This is the move that turns a frizzy air-dry into a smooth one.
For wavy or curly hair, this brushing step is also where you can add a styling product — a leave-in, curl cream, or our Bur Bur Growing Season Deep Repair Mask used as a light leave-in on damp ends. Distribute it with the brush, then let your fingers shape the ends.
With very tight curl patterns or coily hair, take your time and work in small sections. The key is the same: glide, don’t yank, and always detangle wet with plenty of slip from conditioner or a leave-in treatment.
The brushing pass also lifts the strand off the scalp for a minute, letting trapped water evaporate from the roots — giving air-dry hair shape and preventing flat, weighed-down roots.
Step 5: Allow Hair to Air Dry
Walk away.
That’s the entire step. Allow hair to air dry on its own. Don’t touch it. Don’t twist it. Don’t separate the curls into individual strands. Don’t run your fingers through it every five minutes to “check.”
Touching hair while it dries is the single biggest cause of frizz in air-dry routines. Every touch disrupts the wave pattern or curl pattern that is currently setting. Every finger pass lifts the cuticle. Every adjustment to “fix” a piece creates two new frizzy pieces.
Avoid tying hair up while it’s still soaking wet, as this traps moisture against the scalp and can leave bends or kinks as it dries. If your hair is still damp at bedtime, avoid sleeping on it if possible. Overnight friction can undo your styling efforts, so plan your wash time accordingly or use a silk or satin pillowcase to help reduce friction.
Most fine to medium hair air dries within 30 to 90 minutes, while thicker or coily hair may take 2 to 4 hours. Once your hair is completely dry, you can gently shape it with your hands, lift the crown for volume, or smooth a touch of oil through the ends if needed.
How to Air Dry by Hair Type
A summer air-dry routine isn't one-size-fits-all. The same five steps work across every hair type, but the styling products, brush pressure, and finishing moves shift with your texture.
Straight Hair
Straight hair is the easiest hair type to air-dry, but it can fall flat without intentional volume.
-
Brush pressure: Light. Heavy bristles flatten the roots and pull volume out.
-
Styling products: Less is more. A few drops of oil through the ends, nothing at the roots.
-
To add volume: Flip the head upside down for the last 30 seconds of brushing in Step 4. The roots are set with a lift rather than lying flat.
Pro Tip: When styling straight hair, less is more. Heavy products can weigh hair down and leave visible residue, so stick with lightweight formulas and keep them focused on the ends.
Wavy Hair
Wavy hair benefits more than any other hair type from a careful air dry. When styled correctly while wet, waves form naturally and hold their shape without needing heat.
-
Brush pressure: Medium. Use the wet detangling brush, then finish with fingers.
-
Styling products: A small amount of Growing Season Deep Repair Mask used as a light leave-in on soaking wet hair, applied right after step three. Scrunch upward toward the scalp to encourage wave formation.
-
To preserve waves: After scrunching, do not touch the hair; air-dry. Let the wave pattern set undisturbed for at least an hour before any finger styling.
-
Common mistake: Brushing wavy hair after it has started to dry. This breaks the natural wave pattern and creates a fluffy, undefined shape.
Curly Hair
Curly hair and air-drying curly hair specifically are where this routine shines. Heat tools dry out curls faster than any other texture, and air drying curly hair is the gentlest option available.
-
Brush pressure: Use the wet detangling brush only on saturated, conditioner-coated hair. Once the curls are clumped, switch to fingers.
-
Styling products: A curl cream sized to your length. Apply to soaking wet hair, smooth it through with the praying-hands method, then scrunch.
-
To preserve curl clumps: Avoid touching the curls; air-dry. Let them set fully before any second-day refresh.
-
Common mistake: Trying to brush curly hair as it dries. The curl pattern forms during the drying process. Disrupting it mid-set guarantees frizz.
Coily Hair
Coily hair has the longest drying time of any texture and benefits most from the pre-shampoo oil step.
-
Brush pressure: Use a wide-tooth comb in the shower, with conditioner still in, then use the wet detangling brush only, with extra slip. Many people skip brushing altogether and finger-style their hair coily instead.
-
Styling products: Heavier than what curly hair needs. A leave-in conditioner under a curl cream, or a butter-based product if the hair is very dry.
-
To preserve definition: Plopping in a microfiber towel for 10–15 minutes before letting it air-dry fully helps coily hair hold its definition.
-
Common mistake: Going to bed on coily hair that's still damp. Wrap it in silk, or wash it earlier in the day.
Air Drying Techniques to Avoid
Some shortcuts cost more than they save.
|
Technique |
Why People Try It |
Why It Backfires |
|
Rough cotton towel rubbing |
Speed |
Lifts the cuticles, causes frizz, and damages the outer layer of the strand |
|
Tight terry-cloth turban for hours |
Convenience |
Friction plus tension on damp hair creates breakage and dents the wave pattern |
|
Touching hair every few minutes |
Fidgeting |
Disrupts the setting curl pattern, creates flyaways, and increases frizz |
|
Going to bed with soaking wet hair |
Time |
All-night friction against the pillow reverses every step of the routine |
|
Heavy products on fine straight hair |
Belief that more is better |
Weighs down the hair, makes it look greasy, defeats the lightness of an air-dry |
|
Blow-drying the front "just a little" |
Pressed for Time |
Mixed-method drying produces uneven texture and visible heat damage at the front |
|
Skipping the conditioner |
Misconception |
Leaves hair dry and dull, especially in the summer sun |
Avoid disrupting the natural drying process. Avoid touching wet strands. Avoid heat tools when you've committed to an air dry. The fewer interventions during the drying process, the better the result.
Building Your Summer Air Dry Routine Around Real Products
A strong summer air-dry routine doesn’t rely on an overwhelming list of products. It works because each step has a purpose, and each product supports a specific part of the process.
The routine comes down to four essentials: a pre-shampoo oil to support scalp and strand health, a gentle shampoo and conditioner to cleanse without stripping, a microfiber towel to reduce friction after washing, and a wet detangling brush to work through damp hair without breakage.
Used in sequence, these tools create a simple system: nourish before you wash, cleanse gently, reduce friction while drying, and detangle without disrupting the hair’s natural pattern.
There’s no need for heat protectants, heavy styling layers, or multiple finishing products. When the foundation is right, air-dried hair takes shape on its own.
For those building out a full routine, a bundled set of core products can help keep everything consistent, but the real results come from using them correctly and in the right order.
Frequently Asked Questions
Does air-dry hair frizz more than blow-dry hair?
It depends on the technique. A careless air-dry frizzes more than a careful blow-dry. A careful air-dry with a microfiber towel, the right styling products, and an undisturbed drying process produces less frizz than a hot, aggressive blow-dry. The variable is touch — every finger pass while damp hair dries adds frizz.
Can I air-dry my hair every day?
Yes. Especially in summer. Your hair benefits from the break from heat tools. The only caveat: don't go to bed on damp hair night after night. Plan your wash schedule so that hair has enough time to fully air-dry before sleep.
What if I don't have a microfiber towel?
A soft cotton t-shirt works. The principle is the same — flatter fibers than terry cloth, less friction against the hair cuticles. Press and squeeze. Don't rub.
My hair, air-drying, always looks greasy at the roots. What am I doing wrong?
Two likely causes. First, the conditioner is being applied too close to the scalp — keep it on mid-length to ends only. Second, the roots aren't getting enough air circulation during drying. Flipping the head upside down during step four lifts the roots off the scalp, allowing them to dry without sweat.
Is air drying bad for curly-haired people?
The opposite. Air-drying curly hair is widely considered the gentlest option for preserving curl pattern integrity. Diffusing on low heat is the runner-up. Direct heat from a blow dryer without a diffuser disrupts curl clumps and dehydrates the strand.
Can I add volume to fine hair when air drying?
Yes. Flip the head upside down for the brushing step, scrunch the roots gently with the microfiber towel, and avoid heavy products. Fine hair air-dries with volume when nothing weighs it down.
Does air drying help with heat damage?
Air drying doesn't reverse existing heat damage — nothing topical fully does — but it stops adding new damage. Over weeks, a hair air-dry routine plus a weekly oil treatment improves overall condition because the cuticles are no longer being repeatedly assaulted by heat styling.
The Take-Home
A great summer air-dry routine doesn’t require complicated techniques or a shelf full of products. It comes down to a few intentional steps: nourish the scalp, cleanse gently, reduce friction, detangle with care, and let your hair dry undisturbed.
When you work with your hair’s natural texture instead of against it, you spend less time styling and more time enjoying healthier-looking hair all summer long.
